
Convert Photo to Anime Style: Quick AI Tips (convert photo to anime style)
Learn how to convert photo to anime style with simple steps and AI tools. Get practical tips to transform images into vivid anime art.
Ever wanted to see yourself as an anime hero? It's easier than you think. With AI tools like Tooncraft, you can convert a photo to anime style in literally seconds. You just upload a clear picture, pick a vibe you love—maybe something classic like Ghibli or a shonen look like Naruto—and watch the AI work its magic.
Why AI Is Your Best Bet for Anime Conversions
Not too long ago, if you wanted to turn a favorite photo into anime art, you had to find a digital artist. That meant time, money, and a lot of back-and-forth. AI has completely flipped the script. Now, platforms like Tooncraft give you that same artistic power, making the whole process quick, affordable, and honestly, a ton of fun.
This guide is your roadmap. We'll go over everything from prepping your photo for the best results to picking a style that nails the exact mood you're after. This isn't just for artists; it's for everyone. Maybe you're a streamer creating a new avatar, a couple designing one-of-a-kind wedding invitations, or just looking to create a cool family portrait.
The Basic AI Conversion Workflow
At its heart, the process is simple. You give the AI a reference (your photo) and a style, and it does the creative heavy lifting.
This little flowchart shows you exactly what's happening behind the scenes.

You can see how a regular portrait gets reimagined by picking a specific style, ending with a completely new anime image. The real cleverness is how the AI understands the key features of the original face and translates them into the rules of a different artistic world.
The quality of your final anime image comes down to two things: how good your original photo is and how specific you are with your style choice. A clear input gets you a clean, recognizable output.
Let's quickly break down the key stages in this journey from a simple photo to a fantastic anime creation.
Key Stages for Your Photo to Anime Transformation
Here's a quick look at the essential stages of the AI anime conversion process, from getting your picture ready to admiring the final masterpiece.
| Stage | What to Do | Pro Tip |
|---|---|---|
| Preparation | Start with a high-resolution, well-lit photo. | Avoid blurry images or photos with harsh shadows. The cleaner the input, the better the result. |
| Upload | Get your chosen photo into the AI tool. | Most platforms have a simple drag-and-drop or upload button. It's usually the very first thing you do. |
| Style Selection | Browse the available anime styles and pick the one you like. | Don't be afraid to experiment! Try a few different styles to see which one best fits your photo's vibe. |
| Generation | Hit the "generate" button and let the AI do its work. | This part is super fast. You'll usually have your new image in under a minute, sometimes just seconds. |
| Refinement | Review the result. If needed, tweak your settings or try again. | Sometimes a different style or a slightly cropped photo can make all the difference. |
This table maps out the simple, yet powerful, workflow that lets anyone create amazing anime art without any drawing skills.
Compared to doing it all by hand, AI-powered tools have some massive advantages:
- Speed: You get your finished piece in seconds, not days.
- Accessibility: No artistic talent? No problem. Anyone can do this.
- Variety: Instantly try out dozens of unique styles from famous shows and movies.
- Consistency: Need to make multiple images of the same person? The AI keeps the look cohesive every time.
Choosing and Prepping the Perfect Source Photo
Let's be real: AI is amazing, but it can't read your mind. If you want a jaw-dropping anime-style portrait, you have to give the AI good material to work with. I can't stress this enough—the quality of your original photo is the #1 factor that decides whether you get a masterpiece or a muddled mess.
Think of the AI as a world-class artist. If you hand that artist a blurry, dark, or smudged reference photo, what do you think they'll draw? They'll have to guess, and the result probably won't look much like you. A clean, high-quality image is the foundation for everything that follows.
What Makes a Photo "AI-Ready"?
So, what exactly does a good source photo look like? It really boils down to a few simple things that help the AI see and understand your features without any confusion. A well-lit selfie where your eyes are clearly visible will always, always outperform a dark, distant group shot.
Here are the key ingredients for the perfect photo:
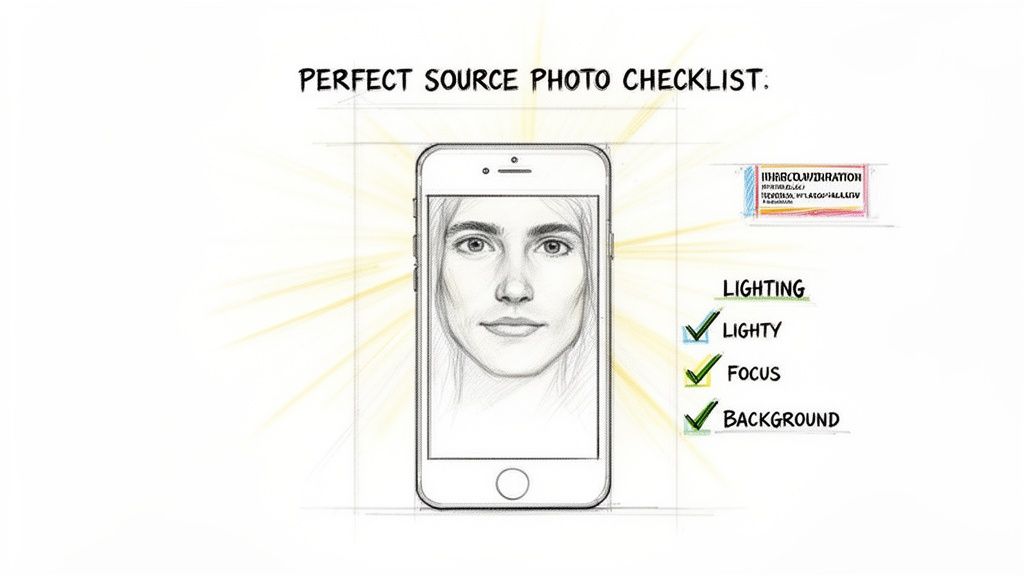
- High Resolution is a Must: Don't feed the AI a pixelated or blurry image. When it can't see the details, it has to invent them, and that's when you get weird artifacts and a likeness that's just... off.
- Good Lighting is Your Best Friend: Find some soft, even light. Harsh overhead lights create strange shadows, and strong side lighting can black out half your face. Pro tip: Natural daylight from a window is almost always your best bet.
- Clear Facial Features are Key: The AI needs to see your eyes, nose, and mouth clearly. Push back your hair, take off the sunglasses, and lose the hat. The eyes are especially crucial for capturing emotion in anime, so make sure they're open and visible.
- Keep the Background Simple: A busy, cluttered background is just noise. It distracts the AI from what really matters—you! A plain wall or a simple backdrop helps the algorithm focus entirely on the subject.
Common Photo Mistakes to Avoid
Knowing what not to do is just as important. I’ve seen so many people get frustrated with their results, only to realize the problem was their source photo all along. Before you hit upload, do a quick mental check to avoid these common pitfalls.
My Two Cents: I’ve found that a straight-on or a three-quarter view portrait almost always gives the best results. Extreme angles or full-profile shots can sometimes be tricky for the AI to interpret, especially when it's trying to map your features to a specific anime art style.
For a much smoother process, make sure to steer clear of these issues:
- Harsh Shadows: Dark shadows from bad lighting can be mistaken for part of your face's structure, resulting in weird, dark patches on your anime portrait.
- Group Photos (for a single portrait): While you can convert group photos, if your goal is a portrait of just one person, crop the image first. Give the AI a single, clear subject to focus on.
- Low-Light or Grainy Images: Photos snapped at night or in a dimly lit bar just don't have the detail needed for a crisp, clean conversion.
- Over-the-Top Filters: Those heavy Instagram or Snapchat filters can warp your features in ways that completely throw the AI off. Start with a clean, unfiltered photo.
When you take a minute to prep your photo, you're not just hoping for a good outcome—you're guiding the AI toward creating something incredible. For some inspiration, check out our gallery of awesome anime portrait avatars to see what’s possible when you start with a great picture.
Alright, with a great photo in hand, we get to the fun part. This is where you step into the director's chair and pick the artistic vision for your image. Tooncraft has a massive creative toolbox with over 50 unique styles to play with.
Deciding to convert your photo to an anime style isn't a single choice—it's more like opening a door to a whole universe of different aesthetics. Are you going for that heartfelt, nostalgic warmth you feel in a Ghibli film? Or is the high-octane, action-packed world of Dragon Ball Z more your vibe? Every style tells a completely different story.
This stage is less about fiddling with technical settings and more about finding the perfect marriage between a style and the mood of your photo. The right choice can turn a simple picture into a piece of art that really connects with people.
Exploring the Tooncraft Style Library
Getting started in Tooncraft couldn't be easier. First, you'll upload your prepped photo—it’s a simple drag-and-drop or a quick click. The moment you do, you’re greeted by the style library, which is essentially a visual gallery of possibilities.
This is what you'll see—a clean layout that lets you browse all the different options without any fuss.
As you can see, the styles are laid out as clear thumbnails, giving you an instant feel for the look you're about to apply. This visual-first approach is great because you can quickly compare different aesthetics without having to generate an image for every single one.
Under the hood, the platform runs on sophisticated image-to-image models, which are the real engines behind the current AI anime generator boom. In fact, these models were so effective they accounted for 44% of the AI anime generator market revenue in 2024. They’re what allow you to precisely turn a selfie into anything from a Dragon Ball Z warrior to a Ghibli daydreamer, all thanks to their incredible visual fidelity.
How to Choose a Style That Fits Your Photo
With so many options staring back at you, how do you actually pick the right one? I’ve found it’s a mix of personal taste and a bit of creative strategy. My advice? Don't just pick your favorite anime. Instead, think about which style best complements the content and feeling of your photo.
For instance, a sweet picture of your dog might look absolutely incredible in a soft, charming Pixar or Disney style. But a dynamic shot of a cosplayer striking an action pose? That would be a perfect match for a more intense shonen style like Attack on Titan or Naruto.
Here are a few scenarios to get your gears turning:
- Family Portraits: Styles like The Simpsons or Ghibli just work for group shots. They add a sense of warmth and fun that’s perfect for families.
- Romantic Couples Photos: For that heartfelt, dreamy vibe, you can't go wrong with the soft colors and gentle lines of a Ghibli-inspired look.
- Action and Cosplay Shots: To really capture energy and movement, look for styles with bold lines and dynamic shading, like those from popular action anime.
- Professional Avatars: A clean, modern anime look can create a sharp and unique profile picture for LinkedIn or other social networks.
The real secret to a stunning conversion is creating harmony between the original photo's emotion and the chosen style's aesthetic. A joyful, sunny photo paired with a dark, gritty style can feel disconnected, while matching them creates a powerful, cohesive image.
To really see what I mean, let's look at how one photo can be completely transformed by different styles.
The Impact of Style: A Side-by-Side Look
Imagine you have a simple, smiling portrait. Here’s how different style choices in Tooncraft could change its entire personality:
| Style Choice | Resulting Mood & Aesthetic | Best For... |
|---|---|---|
| Ghibli | Nostalgic, gentle, and full of wonder. Uses soft, painterly backgrounds and expressive, rounded features. | Sentimental photos, nature shots, and creating a heartwarming feel. |
| Dragon Ball Z | Energetic, powerful, and intense. Features sharp, angular lines, dramatic shading, and a focus on action. | Dynamic poses, fitness photos, or anyone wanting to look like a hero. |
| Pixar | Playful, vibrant, and friendly. Characterized by smooth 3D-like textures, bright colors, and expressive, oversized eyes. | Pet photos, fun family portraits, and creating a modern, cheerful look. |
| Attack on Titan | Gritty, dramatic, and serious. Uses muted color palettes, thick outlines, and a more realistic, hardened character design. | Creating a more intense, moody portrait with a sense of gravitas. |
Honestly, experimentation is your best friend here. Since generations are quick and credit-based, you can easily try three or four different styles on the same photo to see which one just clicks. You might be surprised by what ends up working best!
For a deep dive into all the looks available, you should explore the full collection of anime styles on Tooncraft. It's the best way to get inspired and find that perfect match for your next creation.
Creating Consistent Characters for Your Brand or Story
Making a single, awesome anime image is a great start. But what if you want to tell a story or build a brand? That's where the real magic happens, and it's also where a lot of people hit a wall: keeping a character looking the same across different scenes and expressions.
Moving beyond a one-off conversion is the key to building a visual identity people will remember. Whether you're a streamer who needs a reliable avatar, a marketer creating a friendly brand mascot, or an author trying to bring a character to life, that consistency is what makes them feel real.
With Tooncraft, you can actually build a whole library of poses and expressions for one character. This lets you turn a fun little experiment into a seriously useful tool for your creative projects.
Building Your Character Library
So, what's the secret to getting a consistent character? It’s not as complicated as you might think. It all starts with using a solid set of base photos of the same person.
Gather a handful of pictures showing different emotions and poses, but try to keep the lighting and background as similar as you can. Think of it like a real photoshoot—you wouldn’t just snap one picture and call it a day. You'd capture a whole range of expressions.
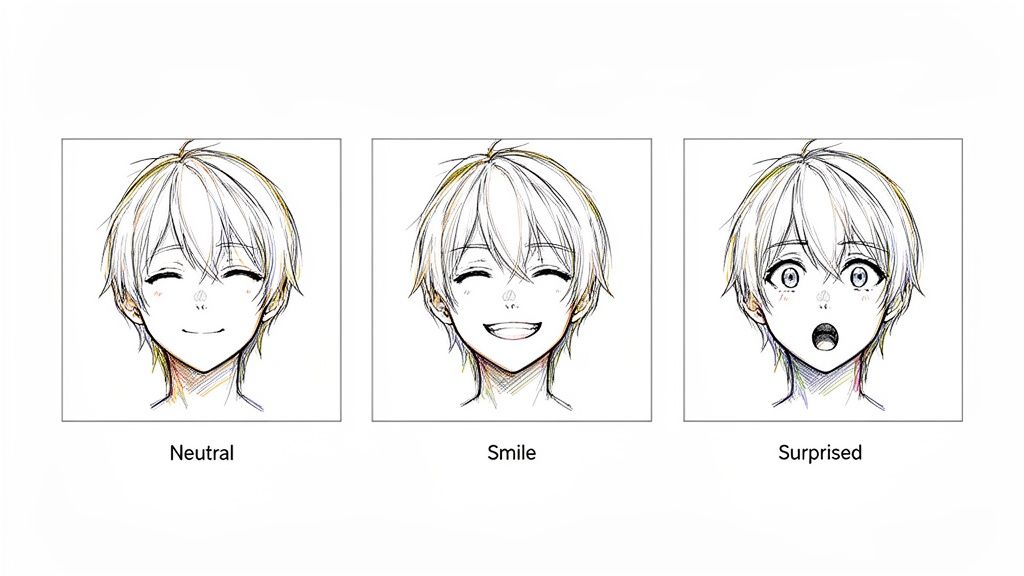
My personal rule of thumb: Start with 5 to 10 photos of your subject. Get a neutral look, a smile, a laugh, a surprised face, and maybe something a bit more serious. This gives you an entire emotional toolkit to play with.
Giving the AI multiple, high-quality reference points helps it learn the person's core features. It gets a much better sense of their unique look, which makes the final anime versions far more consistent.
Locking in Key Features and Details
Once you have your source photos ready, the goal is to "lock in" the details that make your character them. When you convert a photo to anime style over and over, you need the AI to remember those crucial features. A few simple practices here make all the difference.
- Stick to One Style: This might sound obvious, but it's the most important rule. Always apply the exact same anime style from Tooncraft to every photo in your set. If you mix and match, you'll completely lose that consistent feel.
- Keep Your Framing Similar: Try to crop your source photos in a similar way. If one is a tight close-up and the next is a full-body shot, the AI might get confused and interpret the features differently. Consistent input leads to consistent output.
- The Face is Everything: Anime art often simplifies things, so the face is what people will recognize. Make sure every source photo has a clear, well-lit view of the subject’s face.
This is a fantastic method for building a personal brand. A YouTuber, for example, could generate a set of anime reactions—a laughing face for funny moments, a shocked one for surprises—all perfectly matching their on-screen personality. It instantly makes their content look more cohesive and professional.
Real-World Example: A Streamer's Avatar Kit
Let's walk through how this works in a real scenario. Imagine a Twitch streamer wants to create a set of custom emotes and graphics that look just like them.
- Gather the Source Images: First, they take several well-lit selfies against a plain backdrop. They make sure to capture a neutral face, a big smile, an over-the-top surprised expression, and a thoughtful look.
- Pick a Signature Style: They browse Tooncraft and find a vibrant, modern anime style that perfectly matches their channel's high-energy vibe.
- Generate in Batches: One by one, they upload each photo, carefully applying the exact same style every single time.
- Check for Consistency: What they get is a set of four distinct emotions where the character’s hair color, eye shape, and core facial features are identical across all the images.
Just like that, the streamer has a complete visual kit. They can use these consistent images for their "Starting Soon" screen, their "Be Right Back" overlay, and as unique emotes for their subscribers. Their audience immediately recognizes the avatar, which helps build a stronger connection and a more memorable brand.
Bringing Your Anime Creations to Life with Animation
You've gotten pretty good at creating amazing static images, but what if you could make them move? The next step in your creative journey is turning those beautiful anime portraits into living, breathing scenes. We're not talking about learning complex animation software here; we're talking about using AI to add that little spark of life that makes people stop and look.
Think about your character blinking, their hair gently swaying in a breeze, or a subtle smile gracing their face. This is the kind of magic that takes a simple picture and turns it into something truly captivating. Thankfully, platforms like Tooncraft are making this process super accessible, opening up a whole new world of creative possibilities.
This is a total game-changer for so many people. I've seen social media influencers use it to create eye-catching Reels that stop the scroll, and small businesses are designing polished animated logos and short promo clips that look like they cost a fortune.
Prepping Your Images for Animation
Just like with static images, not every picture is a perfect candidate for animation. The source material really matters. The AI does its best work when it has a clear, well-defined subject to work with.
For the best results, you'll want to start with an anime-style image that has:
- A Clear Focal Point: The AI needs to know what part of the image you want to bring to life. A portrait with a prominent face and distinct features is your best bet.
- A Simple Background: Busy, complex backgrounds can sometimes confuse the AI, causing it to animate the scenery instead of your character.
- Good Emotional Potential: An image with a neutral or slightly smiling expression gives the AI more runway to add subtle shifts in emotion.
Here's a pro-tip from my own experience: when you convert a photo to anime style with animation in mind, think ahead about the motion. A forward-facing portrait is often much easier for the AI to animate with natural movements, like head tilts or blinks, than a tricky side profile.
The growth in this space is just wild. The AI anime generator market, which includes tools like Tooncraft, hit a massive USD 91.38 billion in 2024. This boom shows just how much creators and businesses are jumping on AI to get their creative work done faster.
How the AI Magically Animates Your Characters
The animation process inside Tooncraft is built to be super intuitive. You really don't need any animation experience to get great results. The platform uses some pretty sophisticated models to analyze your static image and intelligently apply motion where it makes sense.
Here’s a peek at what the AI can do for you:
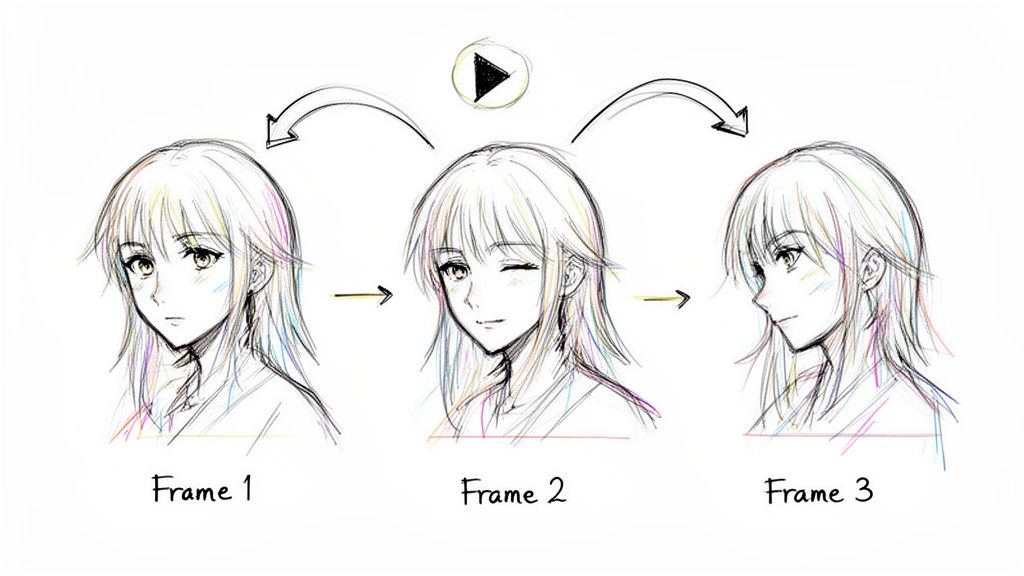
- Subtle Movements: It can add a gentle sway to hair and clothing or even create a sense of atmosphere by moving background elements slightly.
- Changing Expressions: This is the cool part. The AI can make your character smile, wink, or shift their gaze, injecting a dose of personality and emotion.
- Eye-Catching Effects: If you want a bit more flair, you can add simple effects like sparkling particles or gentle light shifts to really make your animation pop.
Practical Ways to Use Your Animated Anime
Okay, so you've made an animated masterpiece. Now what? The possibilities are pretty much endless and go way beyond just being a neat trick.
- Heartwarming Digital Cards: Imagine turning a series of family anime portraits into a short, looping video. It makes for a unique digital holiday card that your friends and family will absolutely love.
- Engaging Social Media Content: Take a photo of your pet, turn it into an anime character, and then animate it. A cute, looping video like that is perfect for Instagram or TikTok and almost always gets more engagement than a static post.
- Professional Branding: Businesses can create an animated version of their brand mascot for their website or social profiles. It makes the brand feel more alive, friendly, and approachable.
For anyone working on bigger projects, features like parallel processing in Tooncraft are a lifesaver. You can render multiple animated clips at the same time, which seriously cuts down on waiting. It lets you get more done, faster.
To see some incredible examples of what's possible, you should definitely check out the huge variety of animations in our video collections.
What to Do When Your Anime Conversion Goes Wrong
Even with a killer AI tool, sometimes the results aren't quite what you envisioned. An eye might look a little wonky, the colors could be off, or the style just doesn't hit the mark. Don't sweat it. This is a totally normal part of the creative process, and thankfully, the fixes are usually pretty simple.
Think of these little hiccups as part of the fun, not a roadblock. A few small tweaks can take a "meh" result and turn it into something you're excited to share. Let's walk through some of the most common issues I see and how to get things looking perfect.
Correcting Weird-Looking Facial Features
One of the first things you might notice is a distorted facial feature—maybe an eye is slightly misshapen, or a mouth looks a bit off. This usually happens when the AI gets a little confused by something in your original photo. It’s not a bug, it just means the AI needs a bit more clarity.
The fix almost always lies in the source image you're using. For instance, if an eye looks strange, check if a shadow or a stray piece of hair is covering it in the original photo. Swapping it for a different picture of the same person, maybe one with cleaner, more direct lighting, often solves the problem instantly. Even just a quick crop to re-center their face can work wonders.
When you convert photo to anime style, the AI is essentially tracing your features onto a new artistic canvas. If your original photo has a smudge—like a weird shadow or an obstruction—that smudge will show up in the final drawing. A clean photo is the secret to a clean conversion.
Fixing Funky Colors and Style Mismatches
Ever get a result with strange, blotchy colors? Or maybe the style you picked just feels… weak? This problem usually comes down to the quality or complexity of the photo you started with.
Here are a few things to look out for:
- Low-Resolution Photos: If your starting image is blurry or pixelated, the AI has to guess what the missing details look like. This can lead to those weird color splotches. A sharper, higher-resolution picture gives the AI the clear data it needs for a smooth, clean result.
- Crazy Backgrounds: A super busy background can throw the AI off. It might "borrow" colors from the background and accidentally splash them onto your subject. To avoid this, try using a photo with a simpler, more neutral background.
- The Style Doesn't Vibe: Let's say you tried the Ghibli style, but it looks off. The problem might be that your original photo has harsh, dramatic lighting that just doesn't match the soft, painterly feel of that style. In that case, either pick a photo with softer light or lean into the drama with a style like Attack on Titan.
Whenever a result feels off, my first step is always to go back and look at the source photo. A small change there is often all it takes. If you've tried these tips on a bigger project and are still stuck, remember that Tooncraft’s priority support (available on Value and Power packs) is always there to help you nail those trickier conversions.
Got Questions? I've Got Answers
Jumping into AI art for the first time usually brings up a handful of questions. It's totally normal. Let's tackle some of the most common ones I hear from people who are ready to turn their photos into anime.
How Many Photos Should I Really Use?
Honestly, you can get a stunning result with just one great photo. The AI is smart enough to work its magic on a single high-quality image.
But if you're looking to create a consistent character—maybe for a profile picture set or a story—my advice is to upload between 5 and 10 photos. Giving the AI a variety of expressions (smiling, neutral, surprised) helps it learn your face better, which means you'll get a more versatile and accurate anime version of yourself.
Can I Turn My Dog (or My Whole Family) into Anime?
You bet! Tooncraft does an amazing job with pets. Seeing your furry best friend as an anime character is genuinely one of the most delightful things you can do with it.
Group photos work just as well. The trick is to use a picture where everyone's face is clear and well-lit. For big family shots or pictures with friends, I’ve found that styles like The Simpsons or Pixar are fantastic for capturing that fun, group dynamic.
But Will It Actually Look Like Me?
Yep, that's the whole point! Modern AI is incredibly good at capturing the little things that make you look like you. Tooncraft is designed to see your unique facial features, hairstyle, and even your typical expressions and translate them into the anime style you pick.
My number one tip for getting a great likeness? Use a clear, front-facing photo with good lighting. Avoid sunglasses or heavy shadows that cover up the very details the AI needs to work with.
Are These Images Mine to Use Freely?
Once you create an image with Tooncraft, it’s all yours. Every single creation is 100% watermark-free, so you can use it for whatever you want.
That means you're free to use your new art for things like:
- Personal stuff: A new profile pic, a unique gift, or a custom phone background.
- Commercial projects: Think marketing materials, a brand mascot for your business, or cool graphics for your Twitch stream.
The possibilities are pretty much endless. You can blend your custom anime art into your personal and professional life without hitting any roadblocks.
Ready to see yourself in a new light? You'll be joining over 10,000 creators who are already bringing their photos to life with Tooncraft. Start creating your anime masterpiece today!