Turn Picture Into Cartoon Free: 7 Easy Methods to Transform Your Photos
Learn how to turn picture into cartoon free with AI tools, apps, and software - easy steps to cartoonize today.
Want to turn a picture into a cartoon for free? You've got options. You can use instant AI web tools, download a dedicated mobile app, or even roll up your sleeves with design software like GIMP. These range from one-click fixes perfect for a new profile pic to more involved methods that give you total creative freedom.
Your Quick Guide to Cartoonizing Photos for Free
Turning a regular photo into a cool cartoon is a great way to liven up your social media, make a unique gift, or just have some fun. But with so many free tools out there, it's easy to get overwhelmed. Each one strikes a different balance between speed, convenience, and how much you can actually control the final look.
This guide will walk you through the best ways to get that cartoon effect without spending any money. We'll compare the most popular approaches so you can figure out what works for your specific project, whether you need something done in five seconds or you want to meticulously craft every line and shadow yourself.
Comparing Your Free Cartoonizer Options
Before we get into the step-by-step stuff, let's take a quick look at the main players. Instant AI tools are all about speed, mobile apps are perfect for editing on the go, and manual software gives you the keys to the kingdom for custom work.
Free Photo to Cartoon Methods at a Glance
To make it even clearer, I've put together a simple table that breaks down the pros and cons of each method. This should help you zero in on the right tool for the job.
| Method | Best For | Pros | Cons |
|---|---|---|---|
| Instant AI Tools | Quick social media posts, profile pictures, and fun experiments | Extremely fast, no skills required, wide variety of styles | Limited customization, potential watermarks, lower resolution |
| Mobile Apps | Editing on your phone, direct sharing to social media | Very convenient, often includes extra editing features | Frequent ads, paywalls for premium styles, can drain battery |
| Manual Software | Unique custom art, brand mascots, detailed illustrations | Complete creative control, high-quality results, no watermarks | Steep learning curve, time-consuming process, requires a PC |
As you can see, what’s "best" really depends on what you're trying to accomplish.
This little flowchart might also help you visualize which path makes the most sense for you.
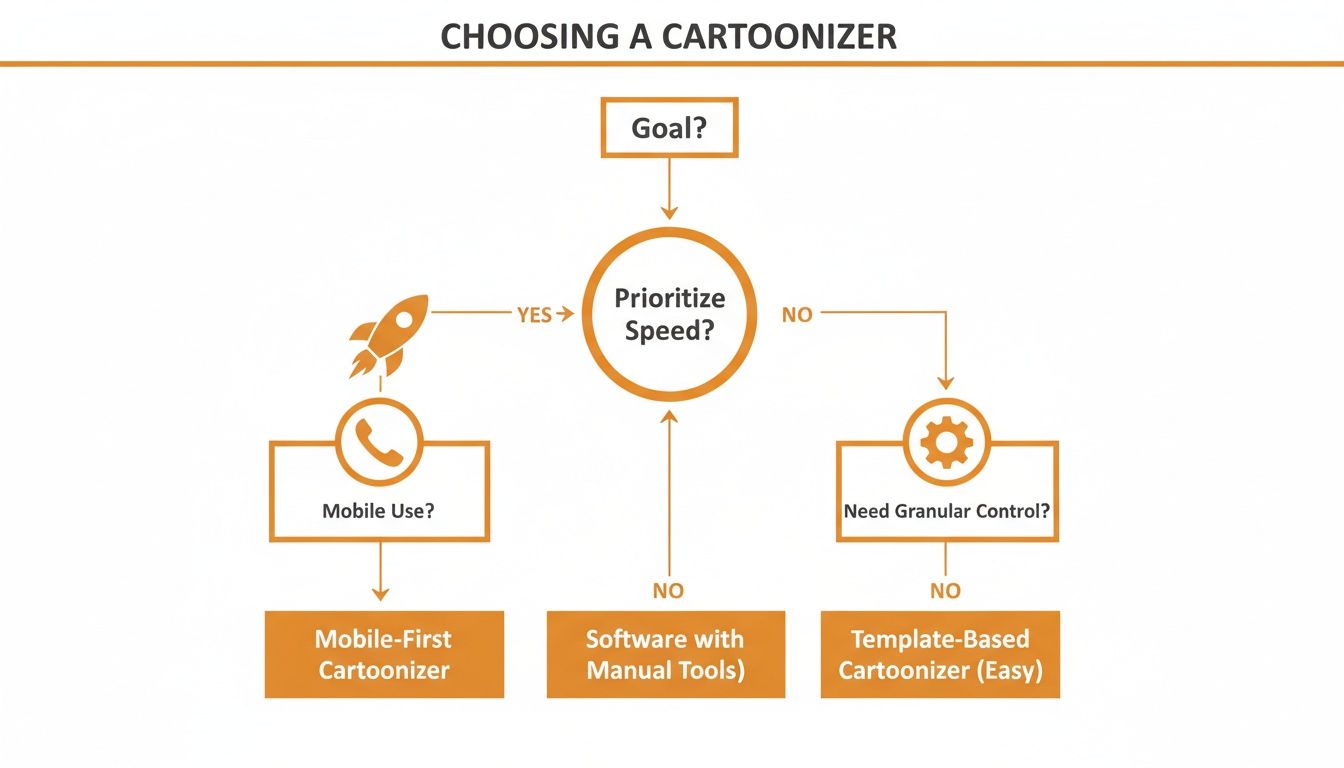
It really just boils down to what you value most: getting it done fast, doing it on your phone, or having fine-tuned artistic control.
Why Choose One Method Over Another?
Think about what you're actually trying to do. If you're a content creator who needs a fun, eye-catching graphic for an Instagram story right now, an AI web tool is your best friend. It’s all about getting a good result with minimal effort.
On the other hand, if you're an artist trying to develop a signature style or a small business that needs a truly one-of-a-kind mascot, putting in the time to learn software like GIMP will be worth it. That path gives you something that is 100% unique and all yours.
For those who want that professional quality without the headache of a steep learning curve, a dedicated service can be the perfect middle ground. You can get a feel for the kind of high-quality results I'm talking about by checking out some diverse cartoon style collections over at Tooncraft.
My Takeaway: Free AI tools and apps are brilliant for quick, casual transformations. But for projects that demand precision, a unique artistic flair, or a truly professional finish, manual software or paid platforms will always deliver superior control and polish. The trick is to match the tool to the task.
Effortless Transformations with AI Cartoonizer Tools
Want to turn a picture into a cartoon for free, and do it right now? Your best bet is one of the many browser-based AI tools out there. These websites are built for one purpose: instant gratification.
You just upload a photo, click a button, and an algorithm cartoonizes your image in seconds. There’s no software to download and no learning curve. It’s the perfect way to whip up a new profile picture, create a quick graphic for social media, or just have some fun.
The Basic Play-by-Play
It’s genuinely simple. Once you’ve used one of these free AI cartoonizer sites, you’ve pretty much used them all. They follow a very similar, straightforward process.
- Find a tool. Just search for "free AI photo to cartoon" and you’ll find tons of options. Look for the big, obvious "Upload Image" button on the homepage.
- Upload your photo. Grab a picture from your computer or phone and let the tool do its thing. It usually only takes a few moments to process.
- Pick your style. This is where the magic happens. The AI will serve up a menu of different cartoon looks—think "3D Cartoon," "Anime," "Comic Book," or "Pop Art."
- Download and go. Once you land on a style you love, you can save the final image. Just a heads-up: many free tools will add a small watermark or limit you to a lower-resolution download.
Here’s a great example of a typical interface. You can see the original photo right next to the fun, cartoon-style outputs.
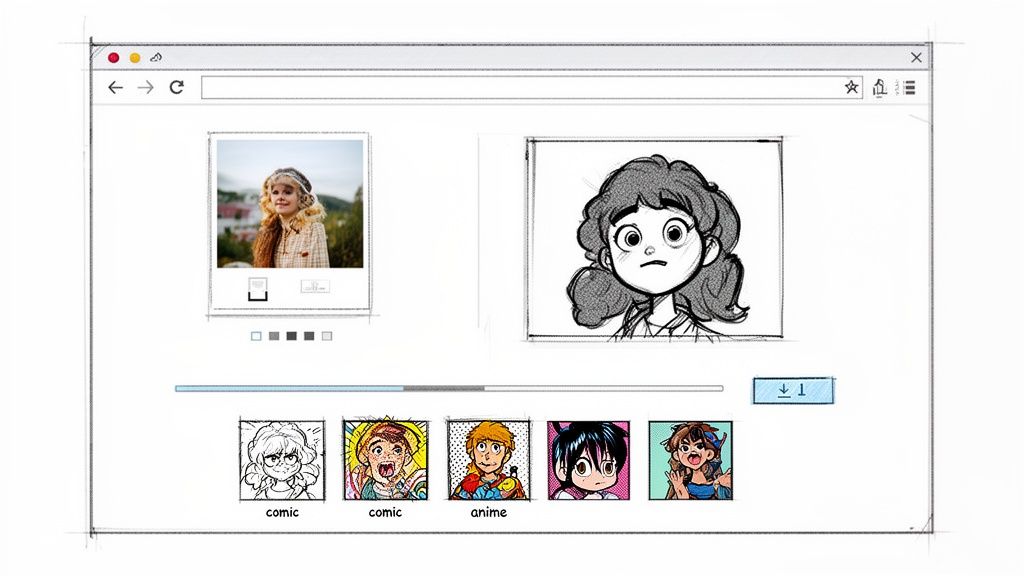
This side-by-side view makes it super easy to see how the AI interprets the original and applies the artistic filter.
Getting Better Results from AI Cartoonizers
These tools are built for ease of use, but that doesn't mean you can't influence the outcome. The quality of your starting photo makes a huge difference. A little prep work goes a long way.
- Start with a high-res photo. The better the quality of your original image, the more detail the AI has to work with. A blurry, pixelated photo will always give you a muddy-looking cartoon.
- Good lighting is key. Clear, even lighting helps the AI properly identify facial features. Photos with harsh shadows or dim, flat light tend to confuse the algorithm and produce weird results.
- Keep the background simple. A busy background can distract the AI from the main subject (you!). A photo against a plain wall or an uncluttered outdoor scene usually works best.
My Personal Tip: I've found that portraits where the person is looking straight at the camera almost always produce the best results. This gives the AI a clear, symmetrical view of the face, leading to much more accurate and expressive cartoon versions.
Common Styles and What to Expect
Most free online tools offer a similar lineup of styles. Knowing what they are can help you choose the right vibe for your image.
| Style | Description | Best For |
|---|---|---|
| 3D/Pixar | Creates that rounded, computer-animated look with smooth shading and bright colors. | Fun family portraits, avatars for gaming profiles. |
| Anime | Features the classic large, expressive eyes, stylized hair, and Japanese animation aesthetic. | Creating a cool avatar, fan art of yourself. |
| Comic Book | Uses bold outlines, a simplified color palette, and sometimes those classic dot patterns. | Action shots, dramatic-looking profile pictures. |
| Sketch | Transforms your photo into what looks like a black-and-white or colored pencil drawing. | A more artistic, hand-drawn look for profile pics. |
While these styles are a blast to play with, remember that free tools often lack consistency. You could upload the same photo twice and get slightly different results each time. This is fine for a one-off profile pic, but not so great for a project that needs a consistent character, like a brand mascot or a YouTube series.
And the magic doesn't stop with static images. This same technology is making waves in video, too. If you're curious to see how these concepts apply to moving pictures, check out our guide on how to create AI videos. It's the logical next step in bringing animated characters and scenes to life.
Cartoon Yourself on the Go with Free Mobile Apps
If you live on your phone, mobile apps are hands-down the easiest way to turn a picture into a cartoon for free. Forget firing up your laptop; these apps are right there in your pocket, ready whenever inspiration for a new Instagram story or TikTok video strikes.
The app stores are absolutely packed with options, all promising to transform your photos with a single tap. The real magic, though, is how seamlessly they fit into your social media routine. You can snap a selfie, give it a cool cartoon look, slap on some text, and have it posted in less than a minute. It’s perfect for creating fun, in-the-moment content.
![]()
This kind of speed and direct access to different filters is exactly why mobile apps are king for quick social media posts.
A Hands-On Look at a Typical Cartoon App
So, what’s it actually like to use one of these apps? The experience is usually super straightforward.
Once you download an app from the App Store or Google Play and give it permission to see your photos, you’re good to go. You just pick the picture you want to cartoonize.
From there, you’ll typically see a whole bunch of different cartoon filters to choose from—think "3D Toon," "Sketch," or "Anime." Tapping a filter instantly applies the effect, showing you a live preview. A lot of apps also have simple sliders for tweaking things like the filter’s intensity or the photo’s brightness.
When you’ve nailed the look, you’ll see big "Share" and "Save" buttons. Hitting "Share" usually brings up your phone’s sharing menu with direct links to Instagram, X, and your other social apps, making the whole process incredibly zippy.
The Trade-Offs of Free Mobile Apps
While the convenience is awesome, free apps have to make money somehow, and that usually means you’ll run into a few catches.
- Advertisements: Get ready for banner ads and sometimes even full-screen video ads that you have to sit through before you can save your creation.
- Watermarks: Most free apps will stamp their logo on your finished image. Getting rid of it almost always means upgrading to a paid plan.
- Freemium Models: You'll quickly discover that the coolest, most impressive filters are often locked. The free version is just a teaser to get you to buy the premium features.
This freemium approach is incredibly common. An app might brag about having 50+ unique styles, but you’ll find that only five or six are actually free. It’s a classic hook to get you to subscribe.
Mobile Apps vs. Web Tools
So, when should you reach for a mobile app instead of a browser-based tool? It all boils down to your workflow and where your final image is headed.
| Feature | Mobile Apps | Web Tools |
|---|---|---|
| Convenience | Excellent; edit and share from anywhere. | Good; requires a browser but no install. |
| Speed | Super fast for on-the-spot editing. | Fast, but you have to upload then download. |
| Social Integration | Superior; built-in direct sharing. | Limited; you have to save it, then upload. |
| Intrusions | High; frequent ads and "Go Pro" pop-ups. | Lower; ads are usually less aggressive. |
| Feature Set | Often includes extras like collages & text. | Usually does just one thing: cartoonize. |
Bottom line: if your main goal is to pump out content for your social feeds quickly, a mobile app is your best bet. The ability to go from photo to post in under a minute is a huge plus. But if you’re already on your computer and just need a one-off conversion without installing anything, a web tool might be the more direct route.
If you're looking for more than just a quick filter and want to really get your hands dirty, then manual software is where the real fun begins. While one-click AI tools are convenient, they often lack soul. For those who want complete artistic control, free programs like GIMP (a powerful alternative to Adobe Photoshop) offer a playground to turn a picture into a cartoon free of any algorithmic rules.
This path is less about instant gratification and more about the creative journey itself. It's for anyone who wants to personally decide the thickness of every line, mix the perfect shade of color, and place every shadow with intention. The result is a piece of art that's genuinely one-of-a-kind—something no AI can truly replicate.
Think bigger than a simple profile picture. This approach is perfect for ambitious projects like creating a brand mascot from the ground up, designing a custom avatar for a gaming channel, or producing fan art that captures your unique interpretation. It demands more time and patience, sure, but the final piece is 100% yours.
A Quick GIMP Guide to Cartooning Photos
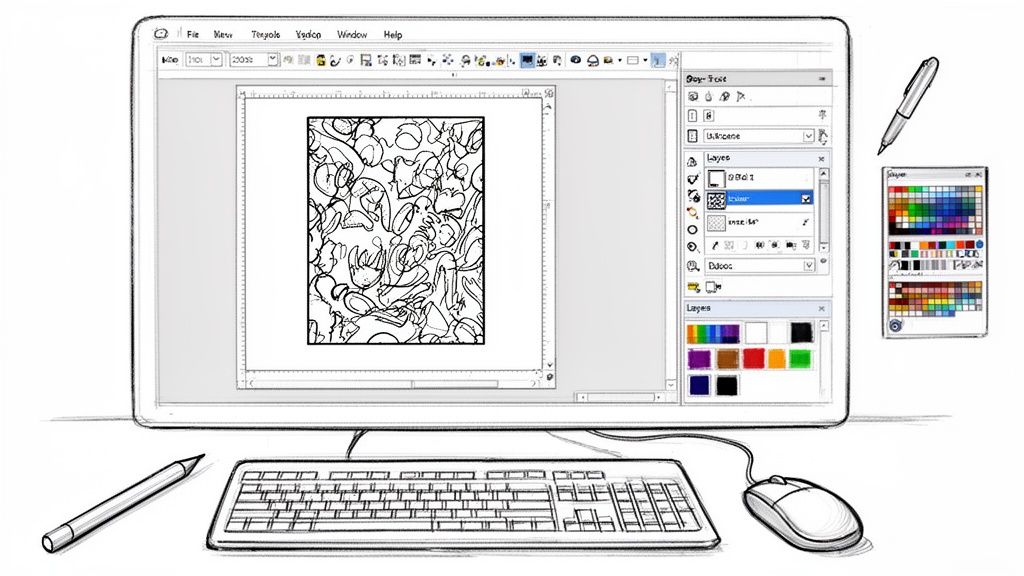
Jumping into a program like GIMP might look a little daunting at first, but the basic process for cartooning a photo boils down to just a few key steps. It's a lot like digital tracing and coloring, but with professional tools to make it easier.
First, you need to simplify the colors in your photo. This is what gives it that flat, graphic look we associate with cartoons and makes tracing a breeze. In GIMP, head to Colors > Posterize. Messing with the "Posterize levels" slider will reduce the color palette. A low number (like 4 or 5) will give you a stark, pop-art vibe, while a higher number will keep more of the original detail.
Next comes the line work—the bold outlines that really scream "cartoon." Create a new transparent layer over your posterized image. Grab the Paths Tool (it looks like a fountain pen nib) and start clicking along the main edges of your subject—the jawline, eyes, clothing folds. Once you trace a shape, you can "stroke" the path with a solid color, giving you a perfectly clean outline.
My Two Cents: Don't get bogged down trying to trace every single hair or wrinkle. The soul of a good cartoon is in its simplicity. Focus on the defining features and don't be afraid to exaggerate things like the eyes or a smile to inject more personality.
Coloring and Finishing Touches
With your line art sitting on its own layer, it's time to bring it to life with color. Create another new layer and drag it underneath your line art but above your original photo. From here, you can use the Brush or Bucket Fill tools to color inside the lines you've drawn.
Working in layers like this is a game-changer. It’s a non-destructive workflow, meaning you can experiment with colors as much as you want without ever messing up your pristine outlines.
- Shadows & Highlights: To add some depth, make another new layer for shading. Use a slightly darker version of your base color with a soft brush to paint in the shadows. You can do the exact same thing on a separate layer for highlights, but with a lighter color.
- Backgrounds: Don't feel stuck with the original photo's background. You can easily get rid of it and drop in a solid color or a simple gradient for that classic comic book panel look.
If you really want to lean into that graphic novel aesthetic, take a look at different art movements for inspiration. Exploring pop art and comic styles can give you some amazing ideas for bold color palettes and dynamic compositions to try in your own work.
Why Go Manual?
Choosing to use GIMP is a commitment, no doubt about it. But the creative payoff is huge. You're not just slapping on a filter; you're the artist making deliberate choices every step of the way.
| Aspect | Manual Software (GIMP) | Automated AI Tools |
|---|---|---|
| Creative Control | Absolute. You decide every line, color, and shadow. | Very limited. You're stuck with pre-set styles. |
| Uniqueness | 100% unique. A direct reflection of your skill. | Not unique. Your image will look like thousands of others. |
| Resolution | As high as you need. Perfect for printing. | Often limited to low resolutions on free plans. |
| Time Investment | High. Can take hours depending on complexity. | Very low. Done in under a minute. |
| Skill Required | Moderate to high. There’s a learning curve. | None. Just upload and click. |
The manual method is a journey, not a sprint. It’s built for creators who love the process as much as the final product and who demand a level of control that automated tools just can't offer.
When to Consider a Professional Cartoonizer Tool
Let’s be honest, the appeal of a free tool to turn a picture into a cartoon for free is huge. For a quick laugh on social media or just to see what you'd look like as a cartoon, they're fantastic. But if you've been playing with them for a while, you’ve probably started to bump up against their limits.
That’s usually where the fun stops and the frustration begins, especially if you’re trying to create something for a real project. The initial sparkle of "free" fades pretty fast when you need more than just a one-off, disposable image.
The Familiar Frustrations of Free Tools
If you’ve spent any real time with these free AI cartoonizers, you know what I’m talking about. A few common walls seem to pop up over and over again. These hiccups are totally fine for casual fun, but they become major roadblocks for any project that needs to look polished and professional.
It's not just about the final image quality, either. It’s about having control and getting consistent results, which is where most free options fall apart.
- Inconsistent Characters: You upload a great photo, get a cool cartoon version, and you love it. Awesome! Then you try another photo of the same person from a slightly different angle, and the AI spits out a completely different character. The eyes are a new shape, the hair color is off, and the whole vibe feels disconnected. Good luck creating a cohesive brand story or a recognizable YouTube avatar with that.
- Annoying Watermarks: This is the classic trade-off. That little logo stamped in the corner of your otherwise perfect image is a dead giveaway that you used a free tool, and it can instantly cheapen your project. Getting rid of it usually means upgrading, which kind of defeats the whole "free" thing.
- Low-Resolution Downloads: Free tools almost always give you a low-res image. It might look decent on your phone, but try to print it on a t-shirt or use it in a high-quality video, and you're left with a pixelated mess. This seriously limits what you can actually do with your creation.
- Limited, Generic Styles: You’ll often see a few basic styles like "Anime" or "3D," but they tend to lack any real artistic depth. You can't ask for a specific look, like the iconic style of The Simpsons or the delicate artistry of Studio Ghibli. You get what the algorithm gives you, and it often feels pretty generic.
The Creator's Dilemma: When you're trying to build a recognizable brand or online persona, consistency is everything. A free tool that generates a different-looking avatar every time is actively working against you. Your audience needs to recognize you, not a random collection of cartoon characters.
How Professional Tools Solve These Problems
This is exactly where dedicated platforms like Tooncraft come into play. They’re built from the ground up to solve the very problems that plague free tools. Investing in a professional tool isn't just about ditching watermarks; it's about gaining a powerful and reliable creative partner.
Think of it like the difference between a cheap point-and-shoot camera and a DSLR. Both take pictures, but one gives you the precision, quality, and control you need for serious work.
Achieving Unmatched Character Consistency
The single biggest game-changer with a professional tool is its AI model, which is specifically trained for character consistency. This is the secret sauce for anyone who needs a reliable digital persona.
Imagine you're a streamer. You need an avatar for your Twitch profile, YouTube thumbnails, and Discord server. A pro tool lets you upload a few reference photos and then generate that same character in countless different poses, expressions, and scenes. Your followers will instantly recognize your brand identity everywhere they see it. That’s a level of reliability free tools just can't touch.
Accessing a Library of Iconic Styles
Professional platforms also open up a massive library of artistic styles. Instead of a generic "cartoon" filter, you get to choose from dozens of specific, beloved aesthetics.
- For the Anime Fan: Want a profile picture in the style of Naruto or Dragon Ball Z? You can do that.
- For the Classic Cartoon Lover: Turn a family photo into something that looks like it came straight out of The Simpsons.
- For a Whimsical Vibe: Create art with the painterly, heartfelt feel of a Ghibli film.
Tapping into these well-known visual languages gives your projects an immediate sense of familiarity and charm that resonates with people.
High-Resolution and Watermark-Free Outputs
Finally, and this is a big one, professional tools deliver the technical quality you need for real-world use. When you create an image with a tool like Tooncraft, you get a high-resolution, watermark-free file ready for anything.
This means you can confidently use your cartoon for:
- Printing: Make custom t-shirts, mugs, or posters that look sharp.
- Branding: Design a professional mascot for your business logo or website.
- Video Content: Drop your cartoon avatar into 1080p or 4K videos without a hint of pixelation.
This shift toward professional-grade tools reflects a much larger trend. The AI-powered cartoon and anime market is absolutely exploding—the global AI anime generator market was valued at USD 91.38 billion in 2024 and is projected to hit an incredible USD 384.40 billion by 2030. This growth is driven by AI's newfound ability to produce high-quality, consistent artwork, putting professional results within reach for everyone. You can dig into more data on this incredible growth from Grand View Research.
At the end of the day, free tools are the perfect playground to get started. But when you’re ready to get serious about quality, consistency, and creative freedom, a professional cartoonizer is the clear next step.
Got Questions About Cartoonizing Your Photos? We've Got Answers.
Jumping into the world of free cartoon-making tools can feel a bit like the wild west. If you're wondering about things like quality, privacy, or just how to get a decent result without wanting to throw your computer out the window, you're in good company. Let's walk through some of the most common questions people have when they decide to turn a picture into a cartoon for free.
The first thing on everyone's mind is usually quality. And for good reason! You want your cartoon to look cool and crisp, not like a pixelated blob. The truth is, the final resolution really depends on the tool you're using.
Most free online AI converters and mobile apps will deliberately cap the output size, often around 1024x1024 pixels. That’s perfectly fine for a new social media profile pic, but it’ll look pretty rough if you try to print it on a mug. If you need something bigger and sharper, you'll probably have to get your hands dirty with software like GIMP or look at a paid service.
How Do I Get the Best Possible Quality?
No matter what tool you pick, the old saying holds true: garbage in, garbage out. Always, always start with the best quality photo you can find. A sharp, well-lit picture with a clean background gives any tool—or artist, for that matter—a much better starting point.
Here's a pro tip: don't be afraid to shop around. If you're using an AI tool, upload the same photo to a few different services. Each one runs on a slightly different algorithm, so one might nail the look you're going for while another falls flat. A little experimentation goes a long way.
My Advice: Zero in on the eyes and mouth in your original photo. These features carry all the expression. A tool that gets these right will create a much more lively and convincing cartoon. If the eyes look weird, the whole thing just feels off.
Are My Photos Safe on These Free Websites?
This is a big one, and it's smart to be skeptical. When you upload a picture to a free online tool, you're essentially handing over your data. Before you upload anything personal, it's always a good idea to take a quick peek at the site's privacy policy or terms of service.
Most of the well-known sites say they automatically delete user photos after a set period, usually somewhere between 24 and 48 hours. Shadier websites might be less transparent. My rule of thumb is simple: if you wouldn't feel comfortable posting the picture on social media, don't upload it to a random free tool.
What Kinds of Photos Work Best for This?
You’ll quickly find that some photos just cartoonize better than others. For the smoothest results, try to follow these general guidelines:
- Portraits and Headshots: Simple photos where one person's face is front and center are the easiest for AI to handle. It has no trouble finding and stylizing the key facial features.
- Clean Backgrounds: A messy, cluttered background can really throw an AI for a loop. It can lead to weird digital artifacts or cause the tool to misinterpret parts of your subject.
- Good, Even Lighting: Photos with dramatic shadows or dim, muddy light often produce a cartoon that looks flat and undefined. Soft, natural light almost always yields a better outcome.
What about group shots? They can be tricky. Many tools get confused when trying to process multiple faces at once. You might find one person looks great while their friend looks like a Picasso painting (and not in a good way). For group photos, you'll often get better results by cartoonizing each person individually and then stitching the images together later.
Tired of the trial-and-error with free tools? If you need consistently great, high-resolution cartoons, Tooncraft offers over 50 unique styles, keeps your characters looking the same across multiple scenes, and provides watermark-free images ready for any project. Start creating your first cartoon with Tooncraft today!